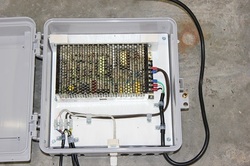
 Today I finished up the Candy (Pixel) Cane project by building the power supply enclosure. Shown is the 12V @ 12.5Amp supply mounted in a Cable Guard CG1500 enclosure. The left cables are the output (Data + 12V). The center is the data input via a box mounted CAT5 jack, and the right cable is the AC power in.
I updated the HOW-TO section with a couple of extra pictures so you can see how the whole thing comes together. Basically, there is the controller with a CAT5 run to the power supply where Data and Power are mixed and output to the candy canes. I'm calling the project compted even though I may rethink how to stand the canes up in the display. I have a pretty good idea on how to do it, but knowing me, I'll come up with 5 different ideas before "lights on" on Thanksgiving night. I also finished the rework of the power/data for the North Poles. Basically the same concept but I used a different power supply and mounted it inside a piece of PVC pipe. The North Poles need VERY little power and I couldnt see dedicating a CG1500 and a 12.5Amp supply to something that uses MAYBE an amp (32 RGB nodes and 8 DMX controllers) . Its almost MAY, and I have been more productive this year than ever. There is still a LOT of work to do. Parts have been order to pixelize the Merry Christmas sign and I already have a quote on building me a steel frame. I'm having more fun this year than ever. So much more to do AND all the programming. But I understand that FastEddy from AusChristmasLighting.Com is coming to the LSH Acedemy in July and talking about a different programming applicaiton called Light Show Pro. Having seen eddy's display (only in video) I may have to take a second look at LSP. Well thats enough for now. I didnt want ya'll to think I had gone into summer hibernation. I'm still hard at it and honestly .... loving every minute of it.
0 Comments
Well I just learned my first lesson as an international importer from China. OK, so, I'm not an international importer, I just buy things through AliExpress directly from Chinese vendors.Back in February, I bought 40 pairs of 4-pin waterproof connectors. They are great for my pixel and node projects. So I needed some more to continue my projects. I get back on AliExpress and pull up my order and reorder another 30 sets. Well after a screw up with our post office (that's another story) I get my slightly damaged bag of connectors. I get them home and count them out. I have 30 female plugs and 28 males. Really 29 but the 29th is missing the screw on part.Okay. I can live with one not complete and one missing, but then it dawns on me. Something is wrong. In my original set the one with the screw on cover was female and these are males. Also, even in they were oriented correctly, they are slightly different sizes!!!Agggggggggggggggh. completely incompatible. Same part number, different part. I have contacted the vendor, but will have to wait on a reply. Project halted (sigh)
Received an invitation from Weebly today to be a Beta Tester for the new Android app. So first thing after installing, I came here to give it a try. So far... So good. I'm going to love being able to blog from the tablet!!!
I finsihed building the MakerShield this afternoon. A MakerShield is a prototyping board that mounts on top of the Arduino board and provides a small breadboard for developing projects. I transfered the LCD project I did last night over to it and its all on one small and compact unit.(I dont have to have the big proto board as shown in the previous posting. )
I started working on the code for the train. I'll get the parts I need to build a small relay switcher. I havent even developed the project and I've already come up with ideas to enhance it. Adding an RGB LED to the project to quickly check the battery status is one thing. Other ideas are brewing!! On another note, my CableGuard enclosures should arrive from Kevin over at CLD tomorrow!! That means I can start working on the power supply enclosures to fishish off the Candy Cane and North Pole update projects. I also ordered another 30 water proof 4 pin connectors (this time NOT over Chinese New Year .. LOL) and they have already shipped. I should see them MAYBE next week... Also I have started sequencing for the Candy Canes and the Merry Christmas sign (both pixel based projects) as well as getting quotes for the aluminium square tubing to make the sign frame out of. All in all, still very busy. Being that I am easily distracted by shiny things, I have to work hard balancing the projects with family life. My new slogan ----- "My train of thought has been derailed!!" 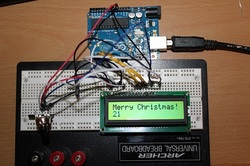 Okay, so I had an idea to control the Little Tykes train and after some research came to the conclusion that a MicroProcessor (MP) would be the best way to deal with what I wanted it to do. Funny thing, I have a degree in Computer Science and have been in the "biz" for almost 30 years and yet I knew diddly about MP's. So I logged on to Do It Yourself Christmas (http://www.doityourselfchristmas.com/) and talked to some pretty smart people over there about my project.
In my search for a solution I came up with Paralax(sp?), RaspberryPi, Arduino, PIC and a host of other ways to approach this thing. I decided that Arduino had such a large user base, was open source, very easy to setup and program, and to get from a prototype to something I could mount and use was the clincher!! Living in Huntsville has its perks but access to electronic parts suppliers ISN'T one of them. Enter.... Radio Shack... ahhh good old Radio Shack. I remeber they day when they were exactly that (Radio Shack by the way is an old amatuer radio term..). Now days unless you need a cell phone there isnt much else to do there. BUT.. as luck would have it, they did have a prototyping kit that contained the Arduino Uno R3 board and a lot fo extras that makes it easy to come and start doing something. So.... I bought one. Now, your asking.. Why? Glad you asked... The more I thought about the Little Tikes Ride On Train, the more I figured there was no way that it would run, even without a rider, for the 4 to 5 hours that the show would be on. So I thought. How about a little "do dad" that would make the train sleep for say five minutes, wake up , blow the whistle, then start the train for 30 to 60 seconds (a lap or two around the track) then repeat. A PERFECT project for a microprocessor to control. The processor, a couple of relays and we are in business!!.Keep on eye out for how this project plays out. The picture is one of the first projets I did with the Arduino toady. Had it for an hour and it already doing something!! KEWL !! |
AuthorBob and Sandra Moody. Archives
May 2016
Categories |
Moody Family Christmas
 RSS Feed
