Leaping Arches - Pixel Strips
We have had several questions about our leaping arches. It seems that I either forgot to take pictures as I was building or I lost them. So I took the camera out to the Christmas shed, located the parts and took some more pictures. I will do my best to try to explain the setup, although, I think after you see the first picture or two it will become obvious what we did. I was Captain Obvious long before the TV commercial...
Our 4 leaping arches are built from 2 WS2811 (12V) pixel strips. Each strip consists of 50 pixels. We control the strips via a J1Sys P2 controller (actually the same one we use for the PixelCanes just partitioned in a new DMX universe) and sequenced with LOR and SuperStar.
Basically, the setup is built from 2x6 blocks that I drilled to hold a CPVC "Tee". 3/4" CPVC connectors fit the 3/4" PEX tubing that we used. PEX is beautiful for this type of project. The project consists of 5 blocks as you see in the pictures. Blocks 1 and 5 are built the same as are blocks 2 and 4. The center block (block 3) has two "Tee's". This serves two purposes. First, each pair of arches uses one strip. This block is where strip 1 ends and strip 2 begins. Second, because of the first reason, this is a perfect place to add power injection to boost the second strip. Yes, we (visually) lose one or two pixels passing through the "Tee's", but you can't tell
The only "critical" measurement that I can claim is the length of the PEX tubing you cut for the arches. With the length of the pixel strips and addition of the "Tee's" they pass through, I came up with a PEX tube (arch) length of 8' (96"). The spacing of the blocks is entirely up to you. The spacing simply sets the height of the arches. Ours are about 24 to 30 inches.
Each of the blocks is cut from a piece of 2x6 (use treated.. this will be outdoors...TIP FROM YOUR OLD PAL BOB... When using treated lumber only purchase what you are going to use as soon as you get home. Reason being, it seems that most of the treated lumber I get lately is still pretty wet and I'm not 100% convinced that it still wasn't a tree the day before I bought it!!!... With that being said, when I say don't buy more than you can use right away is because I have had pieces warp and twist on me while sitting on my shop floor. This is primarily because the change in the environment. Your mileage may vary... but )
For our arches, I cut the blocks 10 1/2" long. This is not a critical length. I thought it gave the blocks a wide enough platform to be pretty stable when the arches where in place and they where staked into the ground.
For the "Tee's" , I simply located the position (depending on the block.. 1,2,4, and 5 are centered) and used a 1-1/8" Forstner bit to drill a hole to set the CPVC "Tee". A generous amount of hot glue was used to hold the "Tee" in place. After all the "Tee's" are set I added the 45 degree couplers. Sorry I don't have a picture of the couple by itself but it has a male 3/4 on one end and the female that you can see on the other. You can glue them in place (we did) being careful to keep them vertical. If the roll over, your arches will lean to the front or the back or twist. Again, this isn't machine shop measurements. eyeball it close. Unless you really roll it over, you wont see any lean or twist.
Depending on what you use to connect your strips ( we used waterproof connectors) you have to make some plans on how to feed the strips through the connectors and through the PEX tubing. With 3/4" tubing, the waterproof connectors will not pass through the ID. (If you bumped up to 1" it might... never tested it and don't have an 1"). Since I wanted the waterproof connectors throughout the project, I had to make the connection on the end of the first strip removable so I could feed it through the blocks and the PEX. I used male/Female splicing connectors and wrapped them. Since they are inside the PEX, they may not be water "PROOF" but they are out of the weather.
I built a simple "Y" adaptor for the center connection (This carries DATA from string 1 to string 2 and provides a power tap for me to inject a new 12V power line) .
I thought this would be a simple How-To but without the step by step pictures its a littler harder than I thought to simply type out an explanation.. I hope the pictures are worth the thousand words.
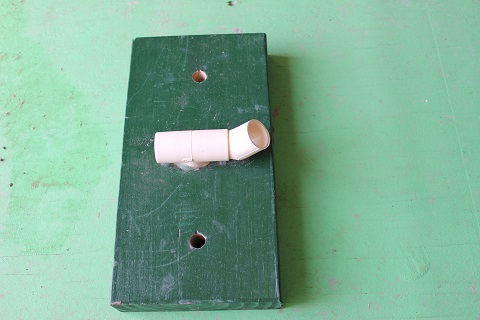
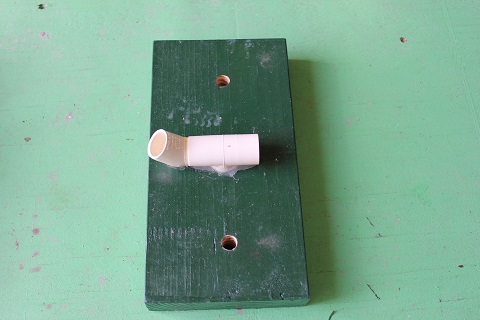
This is Block 1 or 5 (doesn't matter). The CPVC Tee is set with hot glue into a hole drilled using a 1 1/8" Forstner bit. Try to square up the "Tee" with the block and set your 45 degree CPVC connector. The outside holes are for staking the block to the ground.
|
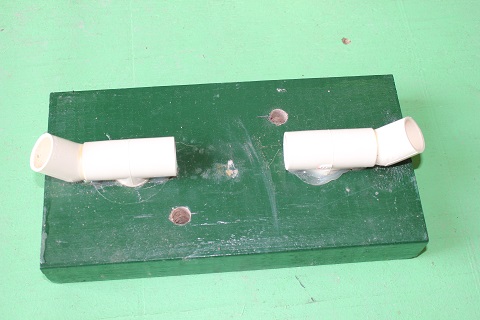
This is Block 2 or 4 (doesn't matter). The CPVC Tee is set with hot glue into a hole drilled using a 1 1/8" Forstner bit. Try to square up the "Tee" with the block and set your 45 degree CPVC connector. The outside holes are for staking the block to the ground.
|
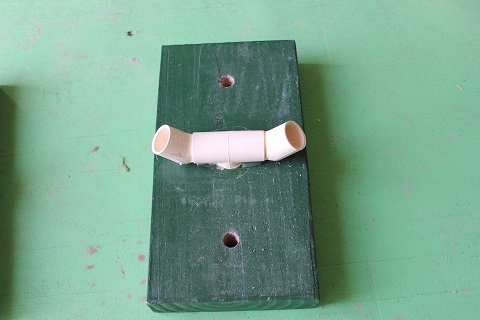
This is block 3. It is the center block between the two strips. The gap in the center allows access to the end of strip 1 and the beginning of strip 2. This is also the point where we inject a second 12V power feed.
|
This is Block 2 or 4 (doesn't matter). The CPVC Tee is set with hot glue into a hole drilled using a 1 1/8" Forstner bit. Try to square up the "Tee" with the block and set your 45 degree CPVC connector. The outside holes are for staking the block to the ground.
|
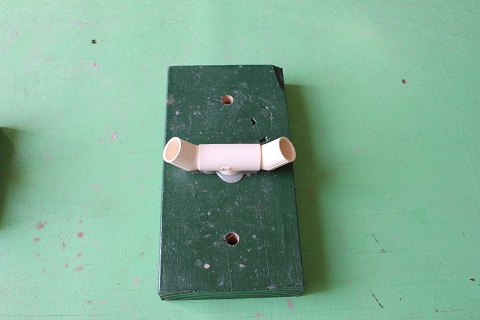
This is Block 1 or 5 (doesn't matter). The CPVC Tee is set with hot glue into a hole drilled using a 1 1/8" Forstner bit. Try to square up the "Tee" with the block and set your 45 degree CPVC connector. The outside holes are for staking the block to the ground.
|
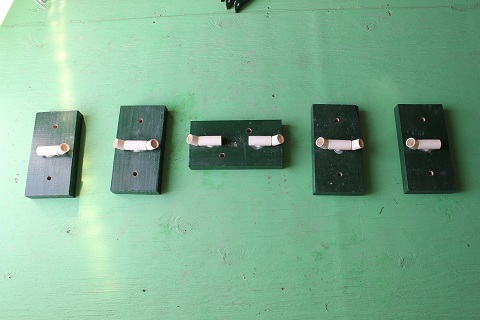
Here are all the blocks laid out as they would appear in the yard.
|
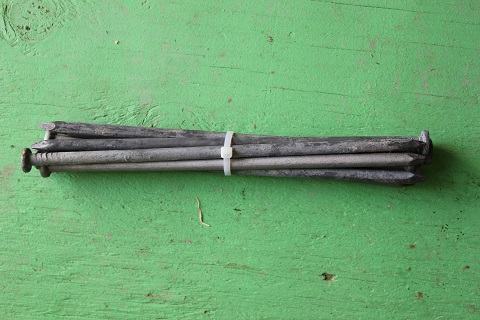
I used long galvanized spikes to hold the blocks.
|
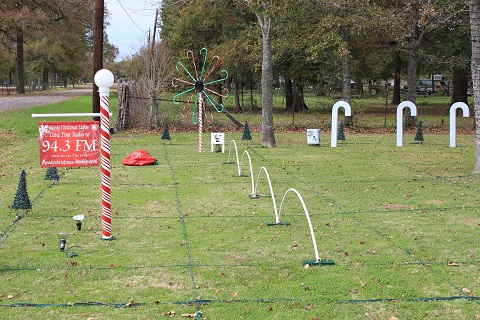
Unfortunately this was the best of the pictures I had that showed the arches built. All the other pics are at night and you can't see the blocks. The box by the Candy Canes is where the controller and power supply is. A cable was built to bring DATA and power to the beginning of the arches and a second power only cable (made from ZIP cord) runs to block 3 (between arch 2 and 3) .
|
