RGB North Poles - A 3 Part How To
At literally the last minute before we put out the 2012 display, we decided to break into RGB and DMX controllers. After seeing the HolidayCoro Candy Cane Post Toppers we decided we had to add some.
We had always used red duct tape to make the big stripes and red electrical tape to make the smaller ones. In 2012 when we built the combined North Pole and Tune-To radio sign display we decided to try our hand at painting the poles. It really worked out well. We continued the practice with this project.
Here is a basic list of what you will need:
3" PVC to make the poles. The amount of PVC depends, of course, on how tall you want to make your display elements.
3" to 4" PVC couplers - You will need one of these for the top of each pole.
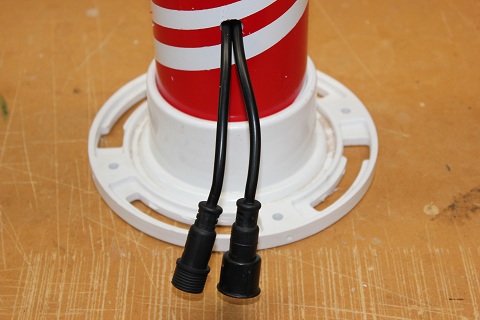
3" Toilet Flange (not punched out) - "Really Bob? A toilet flange?" Yep, you need one of these to make the base with. Nice thing is that you use large galvanized stakes to secure the element to the ground.
1 HolidayCoro Candy Cane Post Topper - Kit is a available of course from David Moore at HolidayCoro
-- Instead of me listing the parts, just visit the link above. David lists all the parts you need to include to build your own
DMX Connectivity - This subject is WAY to broad to cover here. Any DMX type bridge will work. You can use any of the DMX dongles or available devices. We built our DMX system on the J1Sys D2 DMX Bridge. We chose this route becasue we wanted to utilize the capabilities of E1.31 networking in our display.
2013 UPGRADE NOTES!!!!!!!
At the HolidayCoro website David shows you how to utilize CAT5 cable to connect your display elements and how to inject power over the CAT5 cable for power. We utilized these exact techniques in 2012 and they worked fine. However, we noticed that after the season was done, the 3 port adapters and the RJ45 connectors had a lot of corrosion and what appeared to be some arcing going on.
We had always used red duct tape to make the big stripes and red electrical tape to make the smaller ones. In 2012 when we built the combined North Pole and Tune-To radio sign display we decided to try our hand at painting the poles. It really worked out well. We continued the practice with this project.
Here is a basic list of what you will need:
3" PVC to make the poles. The amount of PVC depends, of course, on how tall you want to make your display elements.
3" to 4" PVC couplers - You will need one of these for the top of each pole.
3" Toilet Flange (not punched out) - "Really Bob? A toilet flange?" Yep, you need one of these to make the base with. Nice thing is that you use large galvanized stakes to secure the element to the ground.
1 HolidayCoro Candy Cane Post Topper - Kit is a available of course from David Moore at HolidayCoro
-- Instead of me listing the parts, just visit the link above. David lists all the parts you need to include to build your own
DMX Connectivity - This subject is WAY to broad to cover here. Any DMX type bridge will work. You can use any of the DMX dongles or available devices. We built our DMX system on the J1Sys D2 DMX Bridge. We chose this route becasue we wanted to utilize the capabilities of E1.31 networking in our display.
2013 UPGRADE NOTES!!!!!!!
At the HolidayCoro website David shows you how to utilize CAT5 cable to connect your display elements and how to inject power over the CAT5 cable for power. We utilized these exact techniques in 2012 and they worked fine. However, we noticed that after the season was done, the 3 port adapters and the RJ45 connectors had a lot of corrosion and what appeared to be some arcing going on.

|
|
For 2013, we upgraded our connections and are using "waterproof" four (4) conductor wire sets. Please see Part 3 of this series for more details on what and how we converted the North Poles.

