Candy Cane Pinwheel
By popular demand here is the how to on the Candy Cane Pinwheel. This element continues to amaze us. It was literally just a few days before we began the 2013 setup and since we had redone some landscaping in the yard and added the Pixel Canes we had this box of Walmart lighted candy canes laying around. So mostly as a joke.... I thought... create a candy cane pinwheel. No.. I didn't invent this prop, several people have them in various designs. At first, I built this platform, wall hanging monstrosity that once built looked like it should be a stage for a Smurf concert ... ARRRRGHHHHH!!!! So I checked around some of the Christmas websites and came across a design I liked from a gentleman I have never met in person but through the Christmas forums have known for about 10 years.... Tim Fischer. (link is to his construction details). So .. out to the shop .. and two or three hours later .. POOF .. I had a pinwheel made from scraps, and controlled from a free controller I was given.
Now .. for the BAD news .. I'm usually pretty good about documenting all my builds, but as it turns out .. like the Jitterbug .. this one plum evaded me... LOL ... So after several requests for the how-to I went out to the Christmas storage building and took a few pictures. I think between when I can offer here and what Tim has on his site, it should be pretty easy to figure out the build... I am a little embarrassed as I usually try very hard to make sure I document and publish everything. Over the years, the decorating community has given so much to me that I take pride in being able to give back a little. I'm not a great designer, builder, sequencer or decorator but Sandra and I love it. So.. here it is..
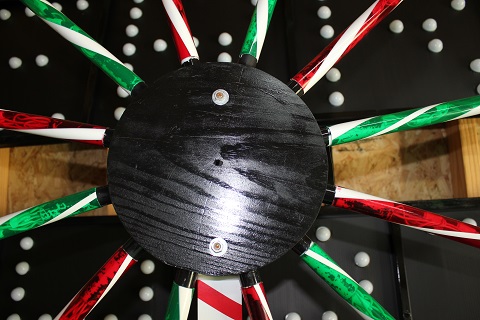
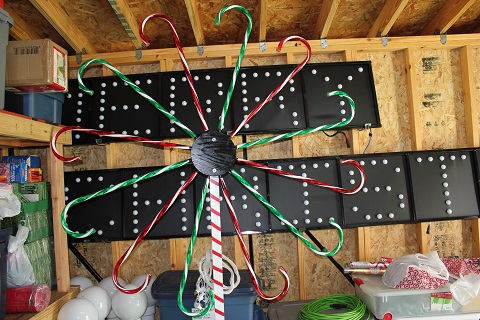
1. The "hub" was a piece of scrap 2x12 that I cut into a circle. There were two hard parts to this build and cutting the circle was one of them. I made a circle cutting jig for my table saw and cut the circle to 9-3/8". Trying to force a 10" fixed blade to cut a circle is not an easy task and if you choose this route USE EVERY SAFETY MEANS AT YOUR DISPOSAL to make sure you don't let it get away from you, kick back or slip and cut your fingers off!!! YOU HAVE BEEN ADVISED !!! With the RIGHT BLADE.. You can do this with a jig saw. Go slow and DON'T force the cut. This will keep the blade straight and perpendicular to the surface.
2. After cutting out the hub, the next task was to drill the holes for the PVC stubs. I laid out the location of the for each of the stubs using a protractor. The center of each hole along the edge needs be at 30 degrees. Bisect the hub then using your protractor carry a line every 30 degrees around the hub. I then projected this line across the edge and located the center at 3/4" of an inch (2 x anything is actually only 1-1/2" thick so the center is at 3/4")
3. The next step was use a 3/4" Fostner bit to drill the holes for the 1/2" PVC. The outer diameter of 1/2" PVC is pretty close to 3/4". I have a drill press and was able to hold the piece perpendicular to the bit. If you don't have a press, lay the hub on its side and have someone help you locate and drill the holes. If you are off a little its not going to kill the project. Night time and blinking lights had a few sins. I drilled each hole about 3" deep. This gives you some support when you glue the PVC pegs into place.
4. After drilling the 12 holes I then cut 1/2" PVC. Exact over length isn't critical. I simply took the 3" that drilled the hole and added another 3" or so to slide into the candy cane. So lets call it 6". You will need 12 of these.
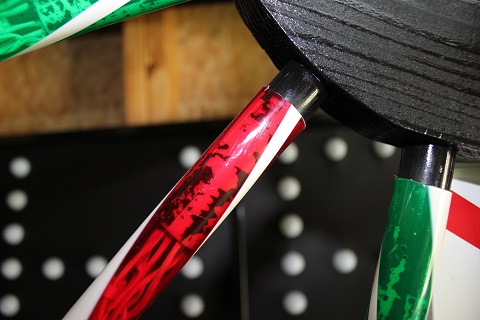
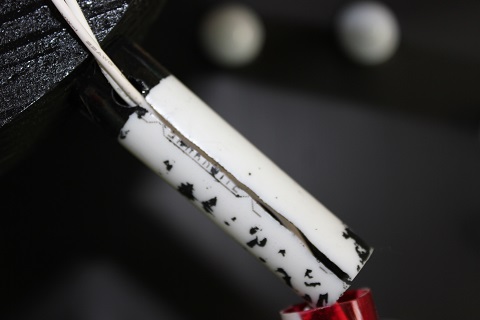
5. You will need a way to get the power cord from the candy cane out so that you can plug it in. I first drilled a hole where the wire would exit and then took something similar to a roto-zip and by hand cut a slot in the PVC from the drilled hole out to the end of the peg. (see picture). This serves two purposes. First it is a way to get the wire out of the cane and second, the inner diameter of the candy cane is less than the outer diameter of the peg. So cutting this slot also allows you to squeeze the peg down and slip the candy cane onto the peg.
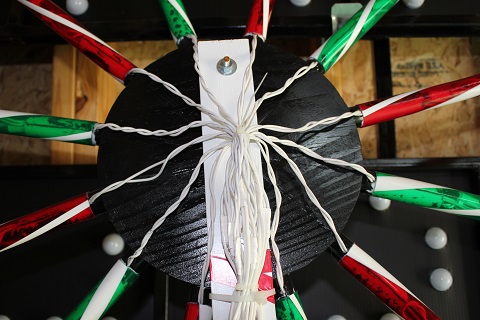
6. Finally, i cut off the plugs, spliced in some white zip cord and extended the cords to the ground where the controller was. I used a piece of 1x2 and cut a point on the end toward the ground (to help stick it in the ground, painted it white, used red electrical tape to candy stripe it and bolted it to the hub. The hub stands about 6'..
7. I figured the 1x2 wasn't going to hold up the way I would want, so tie-wrapped a piece of conduit to the back side when putting the pinwheel out and slide it over a piece of rebar. It held up very well to the winds.
Again... I must apologize to readers and followers for the lack of step by step quality instructions and pictures. As I said this was a total after thought built in one evening. I hope between what I have given you here and what is available on Tim's site that you too can make one of these.
YOU CAN CLICK ON EACH PICTURE TO GET A LARGER IMAGE
Now .. for the BAD news .. I'm usually pretty good about documenting all my builds, but as it turns out .. like the Jitterbug .. this one plum evaded me... LOL ... So after several requests for the how-to I went out to the Christmas storage building and took a few pictures. I think between when I can offer here and what Tim has on his site, it should be pretty easy to figure out the build... I am a little embarrassed as I usually try very hard to make sure I document and publish everything. Over the years, the decorating community has given so much to me that I take pride in being able to give back a little. I'm not a great designer, builder, sequencer or decorator but Sandra and I love it. So.. here it is..
1. The "hub" was a piece of scrap 2x12 that I cut into a circle. There were two hard parts to this build and cutting the circle was one of them. I made a circle cutting jig for my table saw and cut the circle to 9-3/8". Trying to force a 10" fixed blade to cut a circle is not an easy task and if you choose this route USE EVERY SAFETY MEANS AT YOUR DISPOSAL to make sure you don't let it get away from you, kick back or slip and cut your fingers off!!! YOU HAVE BEEN ADVISED !!! With the RIGHT BLADE.. You can do this with a jig saw. Go slow and DON'T force the cut. This will keep the blade straight and perpendicular to the surface.
2. After cutting out the hub, the next task was to drill the holes for the PVC stubs. I laid out the location of the for each of the stubs using a protractor. The center of each hole along the edge needs be at 30 degrees. Bisect the hub then using your protractor carry a line every 30 degrees around the hub. I then projected this line across the edge and located the center at 3/4" of an inch (2 x anything is actually only 1-1/2" thick so the center is at 3/4")
3. The next step was use a 3/4" Fostner bit to drill the holes for the 1/2" PVC. The outer diameter of 1/2" PVC is pretty close to 3/4". I have a drill press and was able to hold the piece perpendicular to the bit. If you don't have a press, lay the hub on its side and have someone help you locate and drill the holes. If you are off a little its not going to kill the project. Night time and blinking lights had a few sins. I drilled each hole about 3" deep. This gives you some support when you glue the PVC pegs into place.
4. After drilling the 12 holes I then cut 1/2" PVC. Exact over length isn't critical. I simply took the 3" that drilled the hole and added another 3" or so to slide into the candy cane. So lets call it 6". You will need 12 of these.
5. You will need a way to get the power cord from the candy cane out so that you can plug it in. I first drilled a hole where the wire would exit and then took something similar to a roto-zip and by hand cut a slot in the PVC from the drilled hole out to the end of the peg. (see picture). This serves two purposes. First it is a way to get the wire out of the cane and second, the inner diameter of the candy cane is less than the outer diameter of the peg. So cutting this slot also allows you to squeeze the peg down and slip the candy cane onto the peg.
6. Finally, i cut off the plugs, spliced in some white zip cord and extended the cords to the ground where the controller was. I used a piece of 1x2 and cut a point on the end toward the ground (to help stick it in the ground, painted it white, used red electrical tape to candy stripe it and bolted it to the hub. The hub stands about 6'..
7. I figured the 1x2 wasn't going to hold up the way I would want, so tie-wrapped a piece of conduit to the back side when putting the pinwheel out and slide it over a piece of rebar. It held up very well to the winds.
Again... I must apologize to readers and followers for the lack of step by step quality instructions and pictures. As I said this was a total after thought built in one evening. I hope between what I have given you here and what is available on Tim's site that you too can make one of these.
YOU CAN CLICK ON EACH PICTURE TO GET A LARGER IMAGE
|
|
|
|
|
